The following user interface elements can be configured for you by the Nuapay Client Support team, please discuss your requirements with your Account Manager.
Logo Configuration
It is possible to define the logo that is displayed on the E-Mandate screens and also in e-mail communications to your customers (e.g. in the notice of mandate activation e-mails).
| Description | A logo displayed on E-Mandate screens and in e-mail communications |
| Example | |
| Default | Not Set |
If you would like to set up the logo, please provide a URL reference for the logo to your Account Manager (e.g. the URL to the logo you use on your Web site); the Nuapay Client Support team will handle the configuration.
Debtor Communication
You may configure E-Mandates to dispatch email communications to your users in response to certain events. When enabled, and depending on your overall configuration, users will receive emails that:
- Prompt them to sign an e-mandate
- Give them the authentication code to sign mandates (if the authorisation method is via email).
- Confirm activation
In addition you, as a merchant, may be configured to receive an email notifying you when a mandate has been signed. (This feature is more appropriate for smaller merchants).
By default, email will be issued with the sender domain = Sentenial e.g. emandates@sentenial.com.
If you would prefer to use your own domain in the email notifications, it is possible to configure this but you will need to make some modifications at your DNS Provider: see Email Customisation for more on this.
Primary, Secondary and Border Colours
The Primary and Secondary colours define how the buttons are rendered on the E-Mandate screens:
| Description | Customisation of the E-Mandate button colour scheme |
| Example | 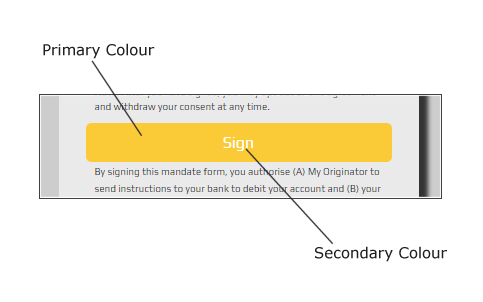 |
| Default | Primary: Orange (#FFCD02); Secondary: White (#FFFFFF) |
In addition to the Primary and Secondary colours, the Nuapay Support team can also configure the border colour displayed on email notification.
| Description | Customisation of the email border colour |
| Example | 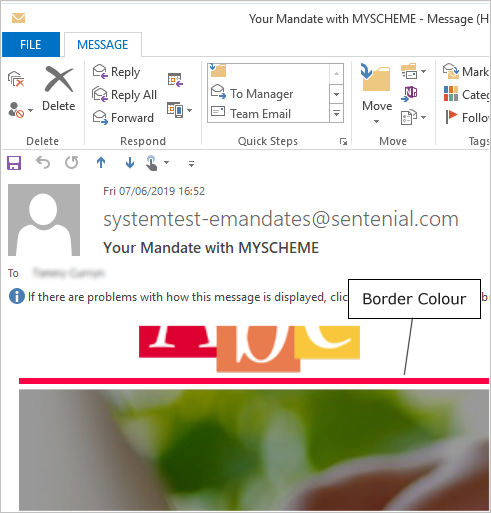 |
| Default | Orange (#FFCD02) |
White Labelling
By default the E-Mandate screens display a ‘Powered by’ logo at the bottom right of the E-Mandate screen. If required, it is possible to hide this icon.
| Description | The Powered by logo is displayed on the bottom right area. |
| Example |  |
| Default | True |
Extended Data
Depending on your business needs you may already have specific customer details (address details for example) and you may just want to collect your customer’s account details. The Extended Data configuration allows you to control what details you are prompting for on the E-Mandate signup form: you can prompt for all fields or just the mandatory fields.
| Description | Control what form data to display. |
| Example |  |
| Default | True |
If required you can refine what elements of the extended screen are displayed. One or more of the following elements may be hidden if required:
- Address
- Mobile Number
- Contract Reference
Please discuss your specific requirements with your Account Manager.
Debtor Input Control
Similar to the extended data configuration, in some cases you may have already collected your users’ details (including account details) and simply require them to sign the mandate. The Debtor Input setting allows you to manage the user interface in this scenario.
| Description | Control whether the data on the e-Mandate page can be edited or not |
| Default | True: editing of fields by the debtor is allowed |
Where Debtor Input Allowed = false you must ensure that account details and all mandatory fields are provided in the Prepare E-Mandate request (POST /emandates).
Success & Failure URLs
Once your customers have completed the E-mandate signing process you can define what confirmation or Failure screen is displayed.
If you have specific requirements around what screens to display here, for example if you want to seamlessly integrate the E-Mandate signup process into your existing payment page, please provide the required URLs to your Account Manager and Nuapay Support will do the rest!
For Success:
| Description | Success - the e-mandate has been signed |
| Default | https://customer.nuapay.com/successful-sign-up/ |
For Failure:
| Description | Failure - where something has gone wrong and the mandate has not been signed |
| Default | https://customer.nuapay.com/mandate-signing-issue/ |